Embroidery with painting on a T-shirt
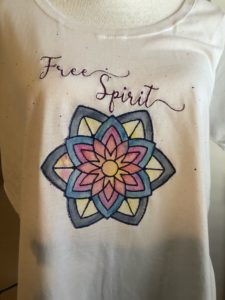
Take an ordinary white t-shirt and turn it into your own work of art.
The embroidery is for the words “Free Spirit” and outline of a mandala. You add the watercolor effect by coloring in with Inktense pencils. I love these pencils because they are actual ink and when activated with water it is permanent on fabric.

I am providing a 3 free embroidery downloads in .jef format for the Janome embroidery machine. I purposely split the text words into two files separate from the mandala design. This will allow you to use the mandala by itself or with the text without needing editing software.
- Text “Free”
- Text “Spirit
- Mandala Design
Watch this video showing how I stitch and paint this out.
method
Embroider T-shirt
- Download the three .jef files inside a .zip file
- Unzip the mandalaembf.zip file.
- Save the files to the EMB/Embf folder of your prepared USB Stick. Refer to a previous post to learn how to prepare the USB stick.
- Plug USB stick into your Janome MC 9850.
- Place tear away stabilizer in the RE20a hoop.
- Mark center front of the T-shirt
- I prefer to “float” the T-shirt with magnets instead of putting inside the hoop. Line the center front of t-shirt with center of hoop.
- I provide great detail on how to combine all three embroidery files on the machine. So give that a watch if you don’t know how to do it.
- Select the thread color you would like for the designs. I used Simthread # 869 Royal Purple for the lettering and #007 Prussian Blue for the mandala outline.
- Spin an extra bobbin.
- Stitch out the embroidery designs

Color in the mandala
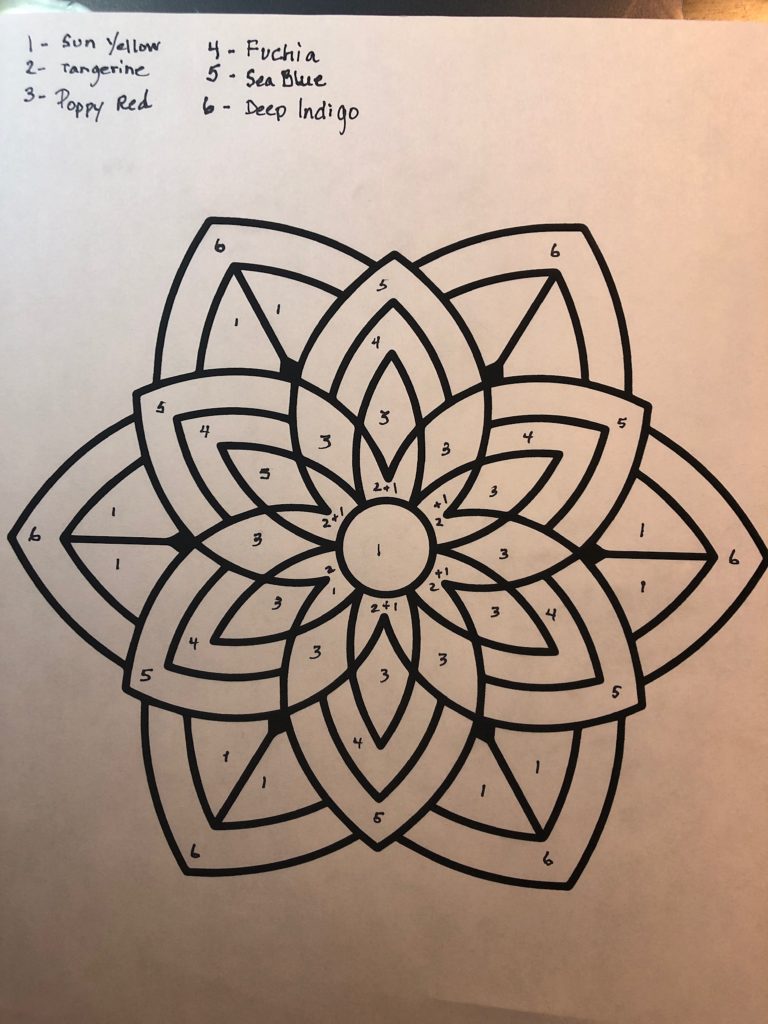
Pick out your own colors, or use the same ones I used. I added numbers corresponding to the colors in the Inktense 12 pencil set.
- Sun Yellow
- Tangerine
- Poppy Red
- Fuchia
- Sea Blue
- Deep Indigo
You will need a small cup of water and a paint brush. I prefer a round brush for the pointed petal and the flat brush for the arch shaped places.
I inserted an inexpensive cutting mat that I purchased from Dollar Tree (2 for $1) on the inside of the t-shirt between the front and back. This is to prevent the water and color from soaking thru to the back.
It is a good idea to start with the lightest color and go dark. Start with the middle circle and paint the water on the circle. I use two methods to apply the color. For dark results, color with the pencil. For more watercolor washed look, I dab the wet brush on the pencil and then dab it on the wet area of the design.
To make the splatter design, I load a good amount of water on the brush and then dab on the pencil and flick the bristles. That is a fun touch that I was please with.

