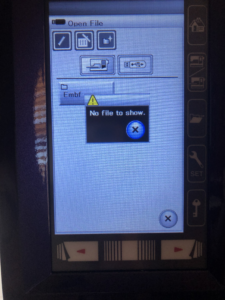
Embroidery is a beautiful and intricate craft that can add a personal touch to any project. The Janome Memory Craft 9850 is a sewing machine that has been designed to make embroidery easier and more accessible. However, if you are experiencing problems with your embroidery files not showing up on your Janome Memory Craft 9850, it can be frustrating and confusing. In this post, I will go over some common reasons why embroidery files may not be appearing on your machine and offer some troubleshooting tips to help you get back to creating beautiful embroidery designs.

I have been struggling to understand why certain embroidery files I copy to my USB stick do no show up on my Janome Memory Craft 9850. There seems to be an extensive list of possible culprits.
If I could open the how to’s on the Janome site I would not need to write this. However, whenever I click on the how to links, they are broken. So, I’m writing this in an attempt to provide a complete list (as I discover it) of requirements in order to stitch out the embroidery designs you create yourself or download from another digitizing source.
I use the following words interchangeably
- Flash drive
- USB stick
- Portable memory stick
These instructions assume you know how to copy embroidery JEF files from your computer to your USB stick.
Troubleshooting checklist
There are several reasons why an embroidery design will not show on the sewing machine. They fall into three categories
- The USB stick
- The file
- The embroidery design

The USB stick
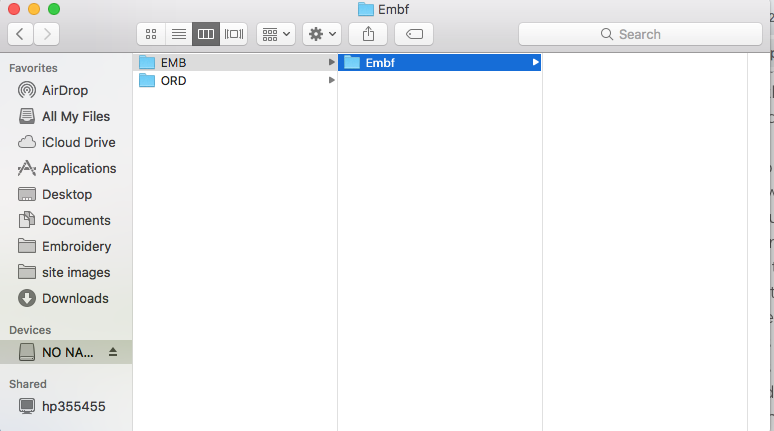
- Stick is formatted with EMB and Embf folder
- Stick does not contain data larger than the memory on the machine. I have heard comments that the stick can’t be larger than 16 MB. I have successfully used a 32GB USB drive. Consider the machine’s memory storage capacity of 3 MB and there are designs saved on your machine already then you are using a USB with tons of data on it, the machine doesn’t have the available memory to read much more. My advice on this subject is to not STORE too many embroidery files on the USB stick. Use it to TRANSFER the design to the machine.
The File
- The first thing to check is the compatibility of the embroidery file you are trying to load. The Janome Memory Craft 9850 uses embroidery files in the .JEF format, so make sure the file you are trying to load is in this format. If your file is not in the correct format, you will need to convert it before you can use it on your machine. There are many free online file converters available that can help you convert your file to the correct form
- File copied to the USB stick in the Embf folder or sub folder under this one
- Machine is in embroidery mode
- The icon for the USB stick is selected in the file display screen
- Design file named appropriately for character, numbers and length
- Ensured the design wasn’t “hiding” on the next page

The embroidery design
- Design is within size does not exceed the largest hoop for the machine model
- Design stitch counts do not exceed the limit of the machine model. I have heard conflicting comments about the actual stitch count limit.
- Embroidery design is centered in the hoop canvas space
Preparing the USB stick
The USB stick must be prepared for the .jef files to show on the machine. The stick must contain two file folders. (1) EMB, then under that (2) Embf . This is the folder to place the embroidery files. It is optional to create folders under Embf as long as the capacity limits are maintained.
I’ve USB stick must not contain more than 8 GB in order for the machine to open the folders. However, I have successfully used a 64 GB flash drive like this one. Keep in mind the USB flash drive should not be used to store all your embroidery files since there is a limit to how much data your sewing machine can read. So although the USB stick can hold 64 GB of data, the Janome can’t open it. Therefore, I recommend only using the flash drive to “transfer” the design from your computer to the Janome.
The files must be place in the Embf folder.
There are two methods to prepare the USB stick folders.
- On the sewing machine
- On the computer
See the following instructions for either of these options.
On the sewing machine
- With the machine powered on, plug the USB stick into the machine.
- Go into embroidery mode. You do not need to have the embroidery unit attached for this procedure.
- Press the file folder icon.
- Press the USB stick icon.
- A folder called “Embf” should be displayed on the screen.
- The USB stick now prepared to be plugged into the computer.
Alternatively, the USB stick can be formatted by the machine.
- Select the Set icon (it looks like a wrench)
- Press the red arrow to go to the next page of settings.
- In the format settings, press the USB stick icon and confirm you are NOT formatting the local machine memory but only the flash drive.
- The USB stick now prepared to be plugged into the computer.
On the computer

- Plug the portable thumb drive (USB stick) into the USB port on your computer.
- Using the file manager, create the two folders. (Use Finder on the Mac).
- The USB stick is now ready to be used to transfer the .jef embroidery files to (and from) the machine.
Embroidery Design Constraints
- The design cannot contain more than 100,000 stitches. However, this number is still unconfirmed. I have yet to see up to date documentation with an actual number.
- Design should be centered in the hoop to make sure it doesn’t exceed the hoop boundaries. I use vector graphics software to open the file to make sure it is centered. You can use Janome digitizing software or this much less expensive Embrilliance Essentials. I have also used the free version of Stitch Buddy to check the size and orientation. Keep in mind the free version does not allow you to save edits.
- The design must fit within the width and height of the largest hoop.
- RE20A 6.7″ x 7.9″ (170mm x 200mm)
- SQ14a 5.5″ x 5.5″ (140mm x 140mm)
- FA10a 1.6″ x 4″ (40mm x 100mm)
- I’ve been told the design name must be less than 8 characters and can only contain numbers and letters. However, I have not found this to be the case
I hope this helps. Please drop me a message if I have misrepresented facts or steps. If I have missed a step, let me know that too.

Pingback: Embroidered Mandala T-Shirt Painting | Freckle Faced Fabric Head
Thank you for this video I have been all over the internet looking for help for this very thing. I hope now I can open my patterns in my machine. Thanks again Ruth.
I’m so glad it helped.
Pingback: How to create patches using Janome MC 9850 embroidery machine | Freckle Faced Fabric Head
Pingback: Top Picks for Amazon Prime Day 2023: Essential Tools for Janome Memory Craft 9850 Sewing Machine Users - Freckle Faced Fabric Head